In this issue:
|
Red Pine Wilderness
Lodge - Our 8
guest cottages set amidst towering,
red
pine trees on a 7 acre
island is the place for your special remote fishing trip or
wilderness family holiday. We are the Gateway to two huge parks:
The Obabika Waterway Park and The Lady Evelyn/Smoothwater
Wilderness Park. We offer the serious angler Northeastern
Ontario's finest Walleye (Pickerel), Great Northern Pike,
Smallmouth Bass, Whitefish and Perch fishing.
WHITE BIRCHES CAMP
in Port Loring, Ontario Explore and fish the Pickerel River
system. Lakeside housekeeping cottages, RV and tent camping and
secluded outposts. Well maintained docks, and boat and motor
rentals. Beaches, recreation room, children's playground,
laundomat, sauna. Off season discounts.
Stanton Air & Outposts - We also
operate the largest selection of remote fishing and eco-retreat
outposts in Southern Ontario. Whether you are looking for a trip
to the cottage, a resort, a fishing and golfing business
meeting, or a vacation to a remote lake, Stanton Air is at your
service.
Sydney Lake Lodge - Canadian
fly-in fishing trips and vacations in Northwestern Ontario
Canada. Trophy fishing for Lake Trout, walleye and northern
pike. The only resort located in both Ontario's Trophy Waters
and Woodland Caribou Wilderness Park. We are located on
exclusive waters on Sydney and Kilburn Lakes. Unrivalled fishing
and wilderness adventure.
Uchi Lake Lodge - Fly-in for the
remote fishing experience of a lifetime!!! Fish Ontario for
Walleye and Northern. Fish for Trophy Walleye and Northern. Why
Fly? Because that's where the fishing pressure is at it's
minimum. Ontario's beauty is an added BONUS!
Marten River Assoc. of Tourist Camps
- A little North of Lake Nipissing and a
little South of Lake Temagami makes for some FANTASTIC fishing
vacations!! Planning to escape from the everyday hectic pace of
the business or family world ..you're heading in the right
direction. Beautiful Marten River with its multitude of lakes
and rivers is a year-round family vacation paradise. Whether
your intention is to escape for a few days or a few weeks, is
more than accommodating.
Fox�s Den Lodge - Fox�s Den Lodge
is located next to the Chapleau game preserve on Dog Lake, 1 �
hrs northwest of Wawa Ontario. After a 30 minute boat ride from
our launch in Missanabie, you can expect to enjoy excellent
fishing for Walleye, Northern Pike, Lake Trout, and Jumbo Perch.
We offer American plan and housekeeping packages.
Robs Ice Bungalows - Robs offers
ice fishing bungalows on Lake Nipissing near North Bay.
Ice Bungalows - Stay in your own
bungalow on the ice on Lake Nipissings south shore
Glen Echo Ice Bungalows - Ice
fishing at Glen Echo takes on a whole new meaning. Our
"BUNGALOWS ON THE ICE" offer a truly unique experience. You stay
on the ice in our comfortable, fully equipped four and six man
housekeeping bungalows. Each bungalow features propane heat,
lights and stove as well as a table and chairs and a kitchen
complete with pots, pans, dishes and utensils. We have even
added a TV and a propane BBQ.
Greening Bay Ice Fishing - "For
top-notch quality, service and pricing, Greening Bay Cottages
offers the best in ice fishing packages on the south shore of
Lake Nipissing. Deluxe accommodations, reliable heated
transportation to heated huts, great fishing. All equipment
supplied. We're the "REEL DEAL". For more information, please
contact 705-752-3558 |
|
"The Beauty of Tying Bucktails" By Tim Allard Bucktail jigs
are extremely effective, but underutilized, baits for many game
fish. These jigs not only catch fish, but are easy to make. To begin
making your own jigs, you will need to invest in proper tools and
tying materials. Below are the tying basics to start saving a few
dollars, and cashing in on bucktails.
You will need a vise to hold the hook while tying. Make sure the
clamp opens enough to accommodate large jig hooks. Purchase a hair
stacker to even the cut ends of the hair prior to tying to the jig,
but you can often accomplish this with scissors. A bobbin is
required to hold the thread in place, and some tiers use a whip
finisher to tie off the finishing knot. Head cement will increase
the longevity of the finishing knot. Pointed scissors are paramount
and can be purchased at a sewing or a fly fishing shop. A final
addition is a fine tooth comb for removing fluff from deer hair.
For simple bucktail jigs, the following is required in various
colors: a selection of deer hair, jig heads, and strong 6/0 thread.
Jig heads without a barbed collar are easier to tie. You can remove
the barb with needle nose pliers, pinching down the remainder flush
with the collar.
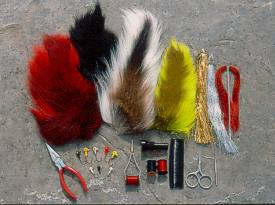
To tie bucktail jigs you need: a selection of
bucktails, jigs, tinsel, Krystal Flash, thread, needle nose pliers,
bobbin, hair stacker, comb, scissors and a whip finisher.
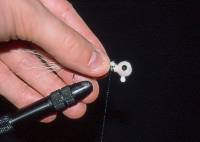
Start by anchoring the jig in the vise hook point
facing down. Next, thread the bobbin. Start tying by winding thread
clockwise onto the jig collar. Hold the thread across the top of the
collar and wind the bobbin over the thread towards the end of the
collar. Cut away any excess thread and wind the bobbin back to the
jig head. Always wind thread tightly when tying and do not apply
thread to the hook. Leave the bobbin hanging free but resting on the
tabletop to stop it from spinning; line twist weakens the thread's
strength.
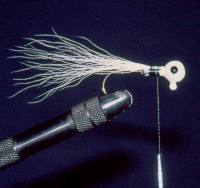
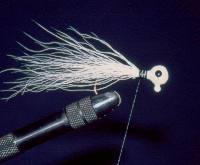
Pinch Bucktail and place on top of collar with cut
ends even, ready for the thread wrap.
After preparing the collar, select a small amount of hair from
the bucktail, lift the tips and cut at the base. I tie my jigs with
four overlapping sections of hair. Smaller amounts of hair are
easier to work with and the four sections are not distinguishable
when tying is completed. Thus, only remove enough hair to cover
one-fourth of the collar. Experiment with the amount of hair you
tie, less for jigs to be tipped with a minnow, more hair for bulkier
offerings, and longer hairs to be used with a stinger hook.
After wrapping hair, wind thread back to the front
of the collar to tie the next section.
Once you have cut a section of hair, continue to hold the hair by
the tips. Using your opposite hand, comb out small hairs and fluff
moving from the tips to the cut ends. This step is essential for jig
tying. Not combing out the fluff and smaller hairs will limit the
jig's action. Measuring hair prior to tying is also important.
Alter your grip, pinching the cut ends of the hair with your
opposite hand. Place the cut ends above the top of the jig collar,
measuring the length. A good rule is to keep the overall length of
the hair within one and a half times the overall length of the jig
itself. If the hair select is too long, trim back the cut ends. If
the hair is too short, select another section from the bucktail and
set the hair aside for a smaller jig.
Next, place the hair in the hair stacker, butts down, to even the
section to be tied to the jig collar. With your thumb and middle
finger hold the base of the stacker, while placing your forefinger
on top of the stacker. While holding the two pieces of the stacker,
tap the base on the table several times. Then, hold the stacker
horizontally, and remove the hair tips with your right hand.
Position the hair on top of the collar and bring in your left
hand to touch the opposing forefinger and thumb of your right hand,
and firmly pinch both the hair and jig. Distribute the hair evenly
around one-fourth of the jig collar. Release the hair with your
right hand and pick up the bobbin, winding thread from the bottom of
the jig head to slightly before the end of the jig collar. Maintain
a tight grip on the hair and jig when tying to ensure the hair does
not spin or flare out. Return the bobbin to the tabletop and select
the next section of hair to dress the side of the body.
Follow the same tying steps as above to dress the sides of the
jig, applying hair to slightly overlap the previously tied section.
To tie the final section, remove the jig from the vise and rotate it
180 degrees with the hook point facing up and anchor it in the vise.
Select and prepare the final section of hair, tying it so it
overlaps the previously tied side sections.
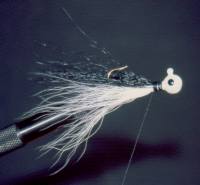
Jig turned upside down to tie final hair section.
To finish, apply head cement to the wrapped jig collar and wind
on several layers of thread. When winding the final section of
thread to the collar wrap further in each direction, covering
previously applied thread. Once complete, position your thread just
below the jig head and tie a finishing knot using the whip finisher.
Cut away thread and apply head cement, securing the body.
Congratulations! You have just successfully tied your first
bucktail jig. You can add variations to this simple jig style using
different colors as part of your four sections. Remember the jig
will swim with the hook eye point upwards, so position your colors
appropriately. Tying peacock hearl or stands of Krystal Flash on the
sides of a jig will create a nice effect, as will tinsel tied on top
of the final layer of hair.
|