

Editors & Publishers
T.J. & Monique Quesnel
The
Ontario Fishing Network
E-Magazine is
published 12 times a year on or near the beginning of every month. Our
magazine is geared to any angler who enjoys fishing of any type in the
wonderfully diverse province of Ontario.
Editorial Submissions: We welcome query letters,
but assume no responsibility for unsolicited materials.
Subscriptions: Subscriptions are FREE of charge
and delivered via email. You can subscribe
HERE:
Privacy Policy: Unlike other publications We
NEVER make our subscribers list (your email address) available to any
other companies.
Advertising: If you are interested in advertising
please email us.
Circulation - 8,200 email subscribers
© 2008 Due North
Marketing / Ontario Fishing Network / T.J. Quesnel. All rights
reserved. Reproduction of any material without prior written
permission strictly prohibited.
Total
Snowshoes
|
 Putting
The Boat to Bed Putting
The Boat to Bed
By Justin Hoffman
As the days grow shorter and the chills begin to take hold, the sad
task of preparing the boat for its yearly hibernation has once again
arrived. Winterizing your pride and joy is a necessary step to
protect your investment while in deep freeze, and will also see it
running in tip-top shape once the season resumes.
Although the task does take some know-how and effort, the end
results are most certainly worth it.
 Getting
Started Getting
Started
It is recommended you consult your owner’s manual, for both boat and
motor, before beginning any winterization measures, as some may have
specific recommendations. If you don’t feel confident with DIY
tasks, please leave the process to a professional marine mechanic.
Winterizing your boat follows a few simple rules that, for the most
part, aren’t too difficult. Take your time, double check your work
and keep a checklist handy to mark off each job as it is completed.
Before getting into the nitty-gritty, give your boat, trailer and
engine a good and thorough cleaning. This will remove the entire
season’s dirt, and will leave the boat sparkling clean when the
cover is removed come spring.
Removing the drain plug is the first plan of attack. Doing so will
allow any water to trickle out, alleviating the issues of freezing
liquid, and the cracking of the hull it can cause when the
temperature plummets. Raising the bow higher than the stern will
ensure that this won’t occur.
Remove all items from your boat, including seats, electronics, life
jacket and fishing equipment. Electronics, such as fish finders and
trolling motors, should be stored inside. Emptying the boat will
prevent items from getting wet and ruined, while also reducing the
chance of animals building nests. I like to toss a handful of
mothballs under the cover and into compartments to further deter
pesky rodents.
With your equipment out of the boat, an inventory can be completed
over the winter months on items that need to be replaced or fixed.
Check for holes, worn or broken parts.
Remove the batteries from the boat. Clean the terminals with a wire
brush and a baking soda and water mixture, and apply some dielectric
grease once they are dry. Check water levels and fill up if need be
– always use distilled water. The battery should be fully charged at
this time, and then periodically charged throughout the winter
months to keep it topped up. (Check it at the first of every month,
and mark it on a calendar so you will remember.)
 The
Outboard Engine The
Outboard Engine
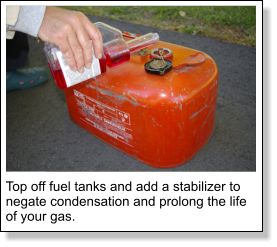
Winterizing an outboard motor involves a few steps, but once
figured out, they aren’t all that complicated. First step is to fill
up all gas tanks, as this will eliminate moisture build-up over the
winter months. Check hoses, bulbs and connectors, and replace if
leaks or deterioration is present.
Change the fuel filter and water separator, and add a fuel
stabilizer to the gas tank, in order to ensure that the gas will be
fresh come spring.
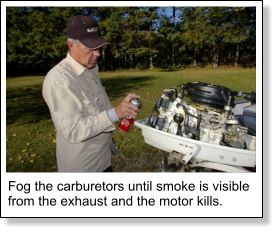
Attach a pair of water mufflers to your garden hose and slide over
water intake vents on lower end of motor. While the water is
running, start engine and allow it to idle for 15 minutes. This will
ensure that adequate fuel stabilizer will get through the entire
system. With the engine running, spray a fogging agent through the
carburetors until smoke is visible from the exhaust and the motor
kills. This oil will cover everything inside the motor, which
alleviates the chance of moisture
 occurring. occurring.
Four stroke engines should have the spark plugs removed and the
fogging agent applied to the cylinder walls, spark plugs and
pistons.
The flywheel (see owner’s manual) should be spun a few times by hand
in order to distribute the oil evenly.
Check spark plugs for wear and tear. I prefer to keep the old plugs
in during the winter, and replace with new ones come spring. Make
sure to gap them correctly when installing.
Coat the entire engine body with a silicone anti-corrosion spray.
This will prevent moisture from adhering to parts and doing harm.
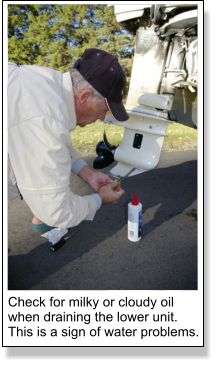 Drain
the lower unit of oil, keeping a close eye out for a cloudy or milky
appearance. If that is present, chances are you have a problem with
your seals, and it is best to consult a marine mechanic with this
problem. If the oil seems fine, pump fresh oil in the lower screw
hole until it seeps out of the upper screw hole. Replace top screw
first, then the lower. Drain
the lower unit of oil, keeping a close eye out for a cloudy or milky
appearance. If that is present, chances are you have a problem with
your seals, and it is best to consult a marine mechanic with this
problem. If the oil seems fine, pump fresh oil in the lower screw
hole until it seeps out of the upper screw hole. Replace top screw
first, then the lower.
emove the propeller and inspect for fishing line or weeds that may
have become entangled along the shaft. If damage is evident on
seals, they will need to be replaced. While the prop is off, give it
the once over for cracks, bends or breaks. If wear is bad, replacing
the unit or getting it rebuilt would be your best bet. Coat the
shaft with lube and replace prop.
Bilges and Livewells
Bilges and livewells should both be thoroughly washed and
dried out. If water does remain, it can lead to damage caused by
freezing. A small amount of antifreeze can be added to both of these
areas as a preventative measure, but must be thoroughly washed out
from the livewells before using them again.
Hull
Now is the time to inspect the bottom and sides of your hull. Be on
the lookout for cracks, damaged or missing rivets or weak joints.
Minor damage can be a DIY project, but major damage will need the
attention of a professional.
Trailer
The trailer is an important part of the winterizing process. I like
to check all lights for water, drying them out completely. Pull the
bulbs and give the sockets a small spray of a moisture repellent.
Check the condition of the seals, and replace light covers.
Inspect the wiring harness (put a dollop of dielectric grease on
connectors and cap them for the winter), the trailer bunks, and
winch.
Jack up each wheel and give the tires a spin. If any sort of grating
noise is heard, or if the tire is not running freely, chances are
you have a bearing problem. This will need to be looked at more
closely. If things seem good, pull the wheel assembly and clean and
re-pack with fresh grease. Once the wheels have been put back on,
top up the grease through the bearing protectors.
Check the condition of the tires for wear, and also for the proper
inflation.
It is best to remove the wheels and store the tires inside, as this
will protect them from the elements, as well as the “flat spots”
that can occur when a trailer sits over time. Make sure you block
the trailer first before beginning this step.
Jacking the trailer by raising the axels while keeping the springs
in the load position is the correct way to go about storing the
boat.
Cover
The boat should be well covered once all the above steps are
completed. Start with the actual boat cover, then a series of poly
sheets can be placed over top. Tie down snugly, with rope and bungee
cords, in order to get a tight and secure fit. Wind and the elements
can get under a cover that leaves the smallest of drafts, so don’t
be afraid to take this step to the extreme.
As you can see, winterizing your boat doesn’t have to be a tough
job. Although I’ve covered the basics above, this list will get you
well on your way for giving your boat the proper rest it needs.
Don’t worry – spring is just around the corner!
|